About the Author


An instructor at five colleges over the years, Paula Darnell most often taught the dreaded first-year English composition classes, but she's also been happy to teach some fun classes, such as fashion design, sewing, and jewelry making. Paula has a Bachelor's degree in English from the University of Iowa, Iowa City, and a Master's degree in English from the University of Nevada, Reno.

Like Laurel, the main character in Death by Association, Paula enjoys all kinds of arts and crafts. Some of her memorable projects include making a hat and a cape to wear to Royal Ascot, sewing wedding gowns for both her daughters, exhibiting her textile and mixed-media artwork in juried art shows, and having one of her jewelry projects accepted for inclusion in Leather Jewelry, published by Lark Books. She sells some of her jewelry and hair accessories in her Etsy shop.

Paula's interest in DIY craft projects and fashion led to her writing hundreds of articles for print and online national publications. She is the author of Death by Association, Death by Design, and Death by Proxy, all in her cozy series, the DIY Diva Mysteries. 

She is also the author of The Six-Week Solution, a historical mystery set in Reno, Nevada, in 1955. A former Reno resident, she was inspired by the local history and found the 1950s when Reno was considered the Divorce Capital of the World to be an interesting era in which to set a mystery. 
 
Paula has won two writing awards in 2020: one from the National Federation of Press Women for Death by Association and another from the Public Safety Writers Association for her historical mystery The Six-Week Solution.
 
Paula lives in Las Vegas, Nevada, with her husband Gary and their 110-pound dog Rocky, whose favorite pastime is lurking in the kitchen, hoping for a handout.


Bear Basics


In Death by Association, Laurel McMillan's dog Bear is her adorable canine companion. He accompanies Laurel on her walks around the neighborhood in her guard gated community, Hawkeye Haven, and he's with her when she discovers that one of the community's guards has been attacked and her gun stolen.

Bear loves to swim, fetch his hard rubber ball, go for his morning walks, play with his doggie friend Goldie, beg for treats, and give Laurel a guilt trip every time she leaves him home alone.


Two of the author's dogs, Teddy Bear, a yellow Labrador retriever, and Rocky Boy, a black Labrador/Great Pyrenees mix, were the inspirations for Bear.

Teddy Bear was adopted from a local animal shelter when he was seven years old. He had been left out in the summer heat (often it's 110 degrees during summer in Las Vegas) and then abandoned by his former people. He adapted very rapidly to his new home where he could lounge in air-conditioned comfort. 


Unfortunately, his nose suffered some permanent damage from the excessive sun exposure, but he was a happy-go-lucky boy, despite it.


Teddy hanging out on the patio.


Teddy guarding one of his stuffed animals.

Rocky Boy was adopted from a rescue organization when he was four. He's now ten years old. Although he looks like a Lab, he acts like a Great Pyrenees. He has no interest at all in retrieving, but he's a great watch dog and likes to try to herd his pet parents when they're not following the routine that he expects. Although Rocky's a mellow boy, he's not above begging for treats; in fact, it's his favorite pastime.


Rocky likes to ride in the car.


Rocky posing for his picture.


Here he is hanging out on the patio wearing his reversible scarf, the same scarf that Bear wore in Death by Association. The instructions to make this scarf are in the back of the book.


DIY Diva Blog

DIY Diva Blog

Here are DIY projects from the author of the DIY Diva Mystery series. Many include step-by-step instructions while others show a project that Paula has created.


Bessie's Dog-Bone Treats

Bessie always had one of these dog-bone treats waiting for Bear every morning when Laurel took . . .click to continue reading full post.
Reversible Two-Tone Fringed Dog Scarf

In Death by Association, A DIY Diva Mystery, Bear knows he’s a handsome boy when he wears the reversible, two-tone, fringed scarf that Laurel . . . click to continue reading full post.


DIY Flower Ring

Looking for an easy DIY jewelry project? Here's a cute ring that's fun to wear for casual . . . click to continue reading full post
  

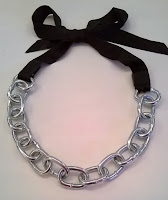
Chain and Ribbon Necklace

Why pay designer prices for a chunky chain and ribbon necklace when you can make your own for under $5? I was inspired to combine the statement necklace. . . click to continue reading full post.

 Just Roses Potpourri

Making your own potpourri from roses couldn't be simpler. All you need are several dried rose blossoms and a few drops of rose-scented essential oil. . . click to continue reading full post.

 Tuna Rice Dog Treats

These tuna rice dog treats have my taster's full endorsement. My dog Rocky gives them a paws up! When it comes to dog treats, Rocky's a connoisseur. . . click for the recipe.
Decorate Your Designs with Fringe

One of my Paula D Sewing Patterns customers sent me photos of a tote she decorated with the beaded fringe she purchased. . . . click to continue reading full post.

Contact


By email: PaulaDarnellAuthor@gmail.com


DIY Diva Mysteries
 
Library distributors of eBooks in the series are Overdrive and Baker & Taylor.

For bookstore and library sales of print books for the DIY Diva Cozy Mystery Series books, please contact the publisher, Cozy Cat Press, cozycatpress.com.
Email: cozycatpress@gmail.com
 
Fine Art Mysteries 
 
Library distributors of eBooks in the series are Overdrive and Baker & Taylor.

Print books distributed to the trade and libraries by Ingram.  
 
For book club sales, please contact the publisher, Campbell and Rogers Press, campbellandrogerspress.com.
Email: campbellandrogerspress@gmail.com

The Six-Week Solution
 
Library distributors of eBooks in the series are Overdrive and Baker & Taylor.
 
Print books distributed to the trade and libraries by Ingram. 
 
For book club sales, please contact the publisher, Campbell and Rogers Press, campbellandrogerspress.com.
Email: campbellandrogerspress@gmail.com

Bessie's Dog-Bone Treats


In Death by Association, A DIY Diva Mystery, Bessie always had one of these dog-bone treats waiting for Bear every morning when Laurel took him for a walk. Now that Bessie’s retired from her job as a security guard at Hawkeye Haven, she still makes Bear a care package of treats every once in a while.

Notes: You’ll need a cookie cutter in the shape of a dog-bone for these treats. Bessie uses a 3 1/4-inch cookie cutter, but you can use another size, if you prefer. Since these treats contain a lot of fiber, monitor the number of treats your dog consumes!

Ingredients

Two 6 oz. jars sweet potatoes (baby food)

1 T olive oil
½ t cinnamon
¼ C milled flax seed
2 C oat flour

Line a baking sheet with parchment paper. Combine the sweet potatoes and olive oil in a mixing bowl. Sprinkle the cinnamon over the mixture and stir in. Add flax seed and stir. Add oat flour, ½ cup at a time, and mix well. Chill the dough for at least one hour. Preheat the oven to 400 degrees. Roll the dough to 1/8 inch thickness between two pieces of parchment paper. Cut out dog-bone shapes with your cookie cutter and place them on the on the parchment-paper-lined cookie sheet. Bake at 400 degrees for about 12 minutes or until the treats are done. Cool on parchment paper or a wire rack. Store the treats in the freezer. This recipe makes about thirty-two 3 ¼-inch dog-bone treats.


Reversible, Two-Tone, Fringed Dog Scarf

The author's dog Rocky modeling the scarf.

In Death by Association, A DIY Diva Mystery, Bear knows he’s a handsome boy when he wears the reversible, two-tone, fringed scarf that Laurel made for him. Bear’s scarf features a Western print on one side and solid brick red on the other side. The decorative fringe on his scarf is brick red, too.

Note: This project requires sewing two straight stitches on a sewing machine. Beginning sewers can easily make this cute scarf for their favorite furry friend.

Materials Needed

Two 5/8 yd. pieces of suede cloth, each a different color
Thread to match one of the colors in the suede cloth
Large sheet of tissue paper or gift wrapping paper

Instructions 

1. Use a yard stick or other straight edge and a pencil to make a pattern on the sheet of paper. First, draw a square, using the measurements below as a guide:

Small size 16 inches square
Medium size 21 inches square
Large size 27 inches square

2. Fold the square of paper diagonally and hold it in place around your dog’s neck to check the size. Adjust the size, if necessary. Cut the square diagonally to make the scarf pattern. Add ½ inch to the diagonal edge for a seam allowance.

3. Place the two pieces of suede cloth right rides together and lay flat. Place the pattern on top of the suede cloth. Use pins, tape, or weight with soup cans to hold the pattern in place while you cut through both layers of fabric to cut out the pieces.

4. Remove the pattern and pin the diagonal edges of the suede cloth, right sides together. Stitch a ½-inch seam. Understitch, turn, and press. Pin unstitched edges to keep them from shifting.

5. For the fringe, cut several 1/8-inch by 5-inch strips of suede cloth. Use all one color for the fringe or alternate both colors. To attach the fringe, start with the bottom point (opposite the stitched seam) and carefully make a ¼-inch slit through both layers of suede cloth ¼ inch from the edge. Laurel uses a seam ripper (very carefully!) to make the slits.

6. Fold a fringe strip in half, wrong sides together. Poke the folded edge through the slits in the fabrics to form a loop. Thread both ends of the fringe strip through the loop and pull them to form a knot to tie it to the edge. Don’t pull the knot so tight that the edge curls.

7. Repeat every ½ inch along the scarf edges, stopping to leave the ends that will be tied together around your dog’s neck without fringe. (On Bear’s large scarf, the fringe stops 7 inches from the ends of the ties.) The ends may be stitched together with a straight stitch ¼ inch from the edge, or they can be left open, whichever you prefer. 

Tie the scarf around your dog’s neck for doggie dress-up. Don’t forget to have your dog pose for a quick pic so you can show the world what a cute furry friend you have.

DIY Flower Ring


Looking for an easy DIY jewelry project? Here's a cute ring that's fun to wear for casual occasions. Although I made this ring with deep pink Ultrasuede, pink lace, a small ivory button, and ribbon yard varigated in shades of pink, it could be fabricated of any color.

The bottom layer, which has the "petals," needs to made of some type of material that won't ravel, so skip any type of woven fabric for this layer, and use felt, faux suede, faux leather, real suede, or real leather. Although a fabric such as suedecloth doesn't ravel, it has too much drape to work for this ring project. The material chosen needs to have enough body to it so that it doesn't droop.


A small button is also required--I used an ivory button that's 3/8" in diameter--as well as an 8-inch length of ribbon yarn.


The first step in making the DIY fabric flower ring is to draw two patterns--one for the flower with petals and one for the middle layer. You can print this page and change the size of the flower to whatever size you desire. The ring I made was approximately 1 1/4 inch in diameter. Draw around a dime coin to make the second pattern--the round one.

Using a small scrap of faux suede and a small scrap of lace, tape the patterns to the wrong side of the fabrics and cut out the pattern pieces. Remove the patterns from the fabrics.


The second step is to slightly gather the round fabric. Using a hand sewing needle and thread that matches the lace, sew a running stitch in a circle about halfway between the center of the lace fabric and its edge. Pull up to form a few little puckers. Knot to secure the thread.


Next, assemble the three layers of the "flower." Use a small button with two holes in it for the top layer. A button with a shank won't work for this particular project. Hold the three layers in place temporarily with two pins through the button holes, as shown above.


The fourth step in making the fabric flower ring is to poke two holes through the two fabric layers. These holes should line up with the button holes in the button so that the yarn can be threaded through all three layers and secured. I used the sharp point of a seam ripper to make the holes through the fabric. You could use the sharp point of embroidery scissors or an awl instead.


To finish the fabric flower ring, use a blunt tapestry needle to pull the yarn through all three layers of the fabric flower. Make sure that the eye of the tapestry needle is smaller than the button holes. Start from the top, go down and through all layers of the fabric, pulling the yarn through with the tapestry needle.

Then pull the yarn back up through the other button hole, leaving a loop on the back. Now try on the ring and pull up the yarn so that it fits properly. If you can tie a knot with one hand, leave the ring in place on your finger and tie the two ends of the yarn in a double knot. Get someone else to tie it if it's too difficult to maneuver with one hand.

Trim the ends of the yarn close to the knot, taking care not to cut the knot itself. Secure the cut ends of the yarn with a drop of clear-drying craft glue. Allow a few minutes for the glue to dry, and you're all done.

Enjoy your fabric flower ring!

DIY Chain and Ribbon Necklace


Necklace 1

Why pay designer prices for a chunky chain and ribbon necklace when you can make your own for under $10? I was inspired to combine the statement necklace chunky chain trend and ribbon trend after seeing a Michael Kors chunky chain necklace priced at an outrageous $700 and several designer statement necklaces with ribbon ties, some priced at over $1000. Good grief!

You can easily get the designer chunky chain look for less. In fact, you can make your own designer chunky chain and ribbon necklace for under $5, using materials from your local hardware store and Walmart. You don't need any special crafting or sewing skills at all. It's so easy that anyone can do it. Here's what you'll need for the necklace pictured above:
  • 1 foot of link chain (I used the passing link chain from Home Depot)
  • 1.5 yards of black 5/8-inch double-faced satin ribbon
  • peel-and-stick black Velcro squares
I already had black silk ribbon and Velcro on hand, so I only needed to purchase the chain, which I found at my local Home Depot for $1.10. This type of chain is normally sold by the foot, and it's available in any home improvement or hardware store, where you can have it cut to any length you need. Ribbon and Velcro are available at fabric stores, craft stores, and Walmart.

To make the necklace, cut ribbon in the middle making two pieces of equal length, loop end of ribbon around end of chain, attach with Velcro, trim ribbon ends, try on, and tie ribbon in a bow at the back of your neck. Voilà! Now you have your own designer chunky chain and ribbon necklace for under $10.

Necklace 2
Here's another easy idea for a DIY chain and ribbon necklace. Like our chunky chain and ribbon necklace, this DIY chain and ribbon necklace will cost only a few dollars, and you can use materials from your local hardware store and Walmart. No special crafting or sewing skills are needed.

The only tools needed to make this necklace are a pair of scissors and some kind of a small blunt instrument, such as a tapestry needle or the flat end of a toothpick. Here are the materials needed to make the necklace pictured above:
  • 1 foot of goldtone decorator chain
  • 1.5 yards of white 5/8-inch double-faced satin ribbon
To make the necklace, cut ribbon in the middle making two pieces of equal length, tie ends of ribbon around ends of chain with a couple of knots. Now poke the ribbon ends back through the knot with a small blunt instrument and cut the ends close to the knot. Trim ribbon ends, try on, and tie ribbon in a bow at the back of your neck. Now you have your own chain and ribbon necklace for under $10.

Necklace 3

Here's another low-cost chunky chain necklace. There's absolutely no need for crafting or sewing skills. Anyone can make this necklace easily. You won't need any tools at all, and there are just two components in the necklace. You'll need:
  • one foot of straight link chain (I bought mine for $1.10 at Home Depot)
  • one 9" x 54" silk habotai scarf (available from Thai Silks (Vendor's Site) in several different colors), priced at about $5 per scarf)
To make the necklace, thread the scarf over and under through the chain links and then arrange the chain so that there are equal lengths of the scarf on both sides. Loop each scarf end back through the chain end to hold it in place so that the chain doesn't slide back and forth when you wear the necklace. Now tie the scarf in a bow at the back of the neck, and you have a chunky chain statement necklace that didn't cost a small fortune.


Here's a variation if you want an asymmetric look. Make one end of the scarf longer than the other, loop scarf ends through chain ends to secure, and then tie the bow at the side front. Très chic!